Tuesday, July 26, 2016

How to get pins from pinterest with Jquery


If you are familiar with PHP you can just use these existing projects from github

1- Pinterest API - PHP

Read more

To use the Pinterest API you have to register yourself as a developer and create an application. After you've created your app you will receive a app_id and app_secret.


2- Pinterest Bot for PHP

This PHP library will help you to work with your Pinterest account without using any API account credentials.

To have an access to Pinterest API you need to go to developers.pinterest.com and register as a developer, then register your application, then wait for confirmation, and only then you will get an access token. With this library you are already ready to go. Just use only your account login and password, like you do it in your browser. But even your account is not required, if your don't use such operations as creating pins, writing comments or sending messages!

Read more


So, in this case I would not follow the PHP code because it would hard for the beginner. I gonna work with jQuery instead in just a few line of code but the result will produce the landslide victories.

1- Copy the somebody pinterest name or your. ex : https://www.pinterest.com/{nameofsomeone}/
2- Create the function to get the request pins from url
3- Extract the object.

See Example

Monday, July 25, 2016

How to check Cron jobs


In the previous article I have shown you to configure cron jobs. Somebody asked me how to check weather cron jons is processing.

So, if you haven't known what is cron jobs please read follow this cron jobs

There are many way to check your cron jobs. To do it you have to :

1- Turn on your terminal and type

   -> service crond status (it will show your cron is running or not)

2- you can test it directly with your Shell

    -> cd /var/www/vhost/yourroot/html/app
   -> Console/cake News (if your code error it will be written into log file)

I hope this two steps will be able to involve your part. so if you think this article is important please help to share to everyone.


Set up cron jobs or crontab in Cakephp


Before stating to set up Cron jobs in your server you have understand and know what the Cron jobs is?

Cron is a Linux utility which schedules a command or script on your server to run automatically at a specified time and date. A cron job is the scheduled task itself. Cron jobs can be very useful to automate repetitive tasks.

Cron syntax
  */5  *    *    *    *  cd /full/path/to/app && Console/cake myshell myparam
# *    *    *    *    *  command to execute
# │    │    │    │    │
# │    │    │    │    │
# │    │    │    │    \───── day of week (0 - 6) (0 to 6 are Sunday to Saturday,
# |    |    |    |           or use names)
# │    │    │    \────────── month (1 - 12)
# │    │    \─────────────── day of month (1 - 31)
# │    \──────────────────── hour (0 - 23)
# \───────────────────────── min (0 - 59)
To understand more please follow this link console-and-shells

1 - Create model News.php
App::uses('AppModel', 'Model');
class News extends AppModel
{
    public function sendNews()
    {
 $this->updateAll(array('is_disabled' => 1), array('delivery_time' => date('H:i').':00'));
    }
}

2- Create NewsSell in Cosole.

class NewsSell extends AppShell
{
   public function main()
   {
    App::import('Model', 'News');
    $News  = new News();
    $News->sendNews();
   }
}

3- Write command in crontab

-> type "crontab -e" in your terminal
->  set cron path "*/1 * * * * /var/www/vhosts/yourwebroot/html/app/Console/cake News"
-> save

Finally, I hope that this article will help you to get reach at the point.

Problem with cron jobs cakephp.


Tuesday, April 5, 2016

Sunday, March 27, 2016

Websocket with PHP


There are many ways to create real time web application with PHP, but in this
case I will show you a best websocket library will be useful for making a real
time web application.

What is Websockt?

It is full-duplex (data can transmitted in both directions) clinet/Server commnuication over TCP.
so you will find out that websocket is the new feature of HTML5 that allow Client script to open
the bi-directional socket connections to a server. Now it work on Chrome, Firefox, Safari, Opera
and other browser even on mobile.

What is PHPWebsockets?

It is websocket libray server which written in PHP. You can
download from there : https://github.com/ghedipunk/PHP-WebSockets

testwebsock.php
#!/usr/bin/env php
send($user,$message);
  }
  
  protected function connected ($user) {
    // Do nothing: This is just an echo server, there's no need to track the user.
    // However, if we did care about the users, we would probably have a cookie to
    // parse at this step, would be looking them up in permanent storage, etc.
  }
  
  protected function closed ($user) {
    // Do nothing: This is where cleanup would go, in case the user had any sort of
    // open files or other objects associated with them.  This runs after the socket 
    // has been closed, so there is no need to clean up the socket itself here.
  }
}
$echo = new echoServer("0.0.0.0","9000");
try {
  $echo->run();
}
catch (Exception $e) {
  $echo->stdout($e->getMessage());
}


client.html

Please run the client.html and don't forget to lunch the testwebsocket.php via common line.

Friday, March 25, 2016

How To Install Node.js on Windows

Node.js® is a JavaScript runtime built on Chrome's V8 JavaScript engine.


To install Node.js on your Windows, please follow all steps below.

Node.js on Machinetos

1.1. Download Node.js

Go to https://nodejs.org/en/download/ and download Windows Installer (.msi/.exe) (32bits/64bits)

1.2. Install Node.js

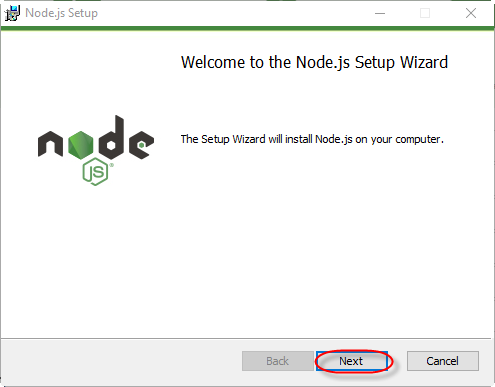
Open the file you have downloaded and click Next:


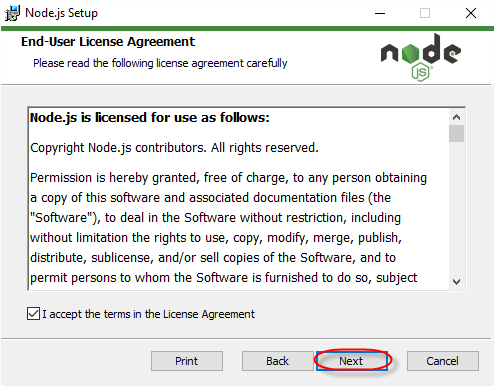
Agree the terms of the software license agreement and click Next:


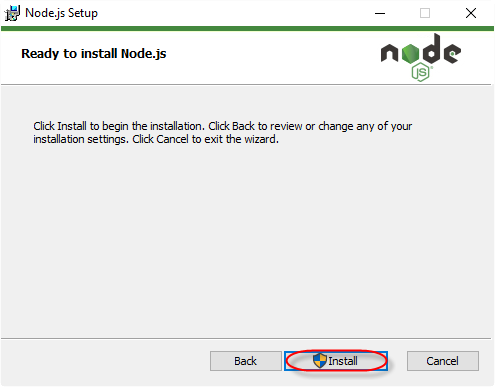
Continue to click Next and Next and then click Install:


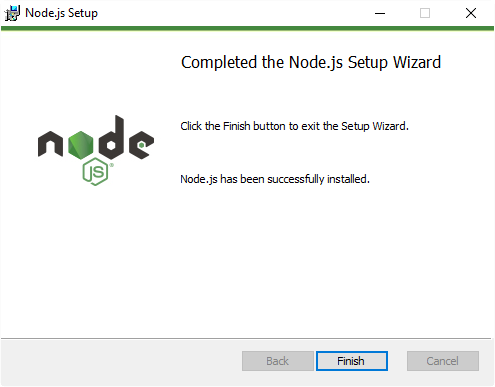
Click Finish:


Test Node.js

To make sure that Node.js is installed on you computer we have to test it by the following steps.

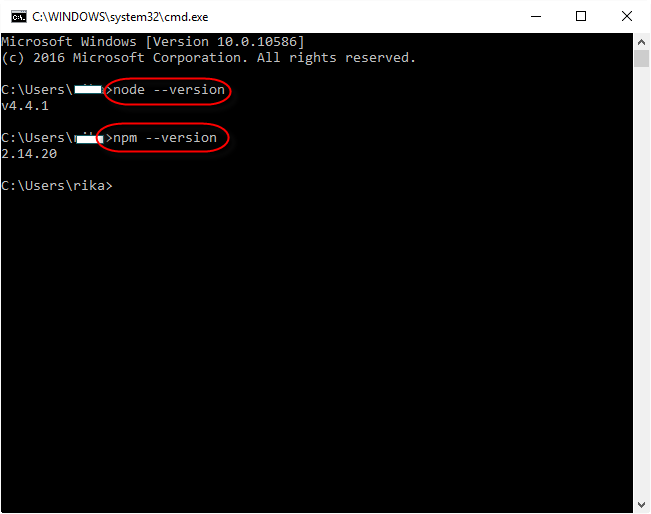
1. Open your CMD and type node --version and npm --version


If you see the version of your current Node.js and npm (Node Package Manager) it means that everything is okay.

If you have any questions related to this article, please leave your question on the comment form below. We will try to answer to your question as much as we can.

Thank your for reading our blog.

Thursday, March 24, 2016

How to Install Node.js on Mac

Node.js® is a JavaScript runtime built on Chrome's V8 JavaScript engine.


To install Node.js on your Machinetos, please follow all steps below.

Node.js on Machinetos

1.1. Download Node.js

Go to https://nodejs.org/en/download/ and download Mac OS X Installer (.pkg)


1.2. Install Node.js

Open the file you have downloaded and click Continue:

Agree the terms of the software license agreement:

And then click on Install:

Congratulation! You just installed Node.js on your computer. Please close the window:

Test Node.js

To make sure that Node.js is installed on you computer we have to test it by the following steps.

1. Open your terminal and type node --version and npm --version

If you see the version of your current Node.js and npm (Node Package Manager) it means that everything is okay.

If you have any questions related to this article, please leave your question on the comment form below. We will try to answer to your question as much as we can.

Thank your for reading our blog.

Wednesday, March 23, 2016

Create nested menu with PHP, Mysql, CSS

How to create a nested menu ,

Before starting to implement , I would sure that you will understand the PHP, Mysql, HTML and CSS.

1- You have to download this project and try to create the database which you will be able to find in the zip file.
2- Test it on your computer, then if everything is fine please look through with the explanation.

- connection.php is the file to connect to database
- example.php is the file to display the menu
- style.css  the decoration of menu.

*connection.php
 define('DSN','mysql:host=localhost;dbname=db_menu');
 define('USERNAME' , 'root');
 define('PASSWORD' , '');
 try { 
      $DB = new PDO(DSN, USERNAME, PASSWORD); 
  } 
  catch(PDOException $e) { 
       echo $e->getMessage(); 
  } 
 
  try { 
       $sql = "SELECT * FROM drop_down";
 
       $result = $DB->query($sql);
       $row_count = $result->rowCount();
       if($row_count){
       $rows = $result->fetchAll(PDO::FETCH_ASSOC);
       }
  }catch(PDOException $e) { 
       echo $e->getMessage(); 
  } 

*example.php

*menu.css
body {
   font: 15px arial, helvetica, sans-serif;
 }
 ul.multidrop a {
   color: #fff;
   text-decoration: none;

 }
 ul.multidrop {
   padding: 0;
   margin: 0;
   background: #DF5B50;
   float: left;
 }
 ul.multidrop ul {
   padding: 0;
   margin: 0;
   background: #DF5B50;
   float: left;
 }
 ul.multidrop li {
   padding: 5px;
   float: left;
   display: inline;
   position: relative;
   width: 150px;
   list-style: none;
   cursor: pointer;
 }
   ul.multidrop li:hover {
   background: #3EC4F6;
 }
 ul.multidrop ul {
   position: absolute;
   left: 0;
   top: 100%;
   background: #3EC4F6;
   display: none;
 }
 ul.multidrop ul ul {
   left: 100%;
   top: 0;
   background: #DF5B50;
 }
 ul.multidrop li:hover > ul {
   display: block;
   background: #3EC4F6;
 }
 ul.multidrop li ul li:hover {
   background: #DF5B50;
 }

Next trip that related to this post will be published soon.

cheer!

Some Useful PHP Tricks You May Not Know

After I read many articles, I found some cool tricks in PHP that are very useful for our projects. Please have a look at 5 tricks below you may satisfy with them.


1. Array in Form Fields

Not only the form input fields that create array like
<input name="name['fullname']">
but you can create arrays with checkboxes also.

<label><input type="checkbox" name="hobbies[]" value="Sports" /> Sports</label><br />
<label><input type="checkbox" name="hobbies[]" value="Hiking" /> Hiking</label><br />
<label><input type="checkbox" name="hobbies[]" value="Swimming" /> Swimming</label><br />
<label><input type="checkbox" name="hobbies[]" value="Swimming" /> Watching Movies</label><br />

2. Count Character in a String

When you want to count the string you will think about strlen() function. However, we have a fastest way to count it. Take a look at the following code:

$string = 'testing';

if(isset($string[6]))
 echo "The string '$string' is at least 7 characters long.";
else
 echo "The string '$string' is less than 7 characters long.";

You treated $string like an array.

3. Use PHP Echo like a Boss

Most of the time we always thought that if we want to concatenate strings with echo, we need to use period. But we can use echo like a function that can replace period with commas instead. Please look at the fastest way to do so:
$string1 = 'test-string1';
$string2 = 'test-string2';
$string3 = 'test-string3';

echo 'String #1: ', $string1, '
'; echo 'String #2: ', $string2, '
'; echo 'String #3: ', $string3, '
';
You will find some more useful trick anywhere else, but these cool tricks is for you. Good luck!

Tuesday, March 22, 2016

Create component to validate IPN (Instant Payment Notification) with Cakephp


It's seem to be for senior programmer, but I just want to let somebody know the benefit or how to implement the IPN of PayPal using PHP or Cakephp, before you can understand what to do with IPN you have take a look this website.

If you don't know at all about Paypal please read the previous article : Paypal
class IpnComponent extends Component
{
   public function validate_ipn_data($data_ipn)
   {
     //Change these with your information
     //Sandbox for testing or empty ''
     $site = @$_SERVER['SERVER_NAME'];
     $paypalmode = $site === 'your_site' ? '' : 'sandbox';

    if ($data_ipn) {
       if ($paypalmode=='sandbox') {
          $paypalmode     =   '.sandbox';
       }
       $req = 'cmd=' . urlencode('_notify-validate');
       foreach ($data_ipn as $key => $value) {
           $value = urlencode(stripslashes($value));
           $req .= "&$key=$value";
        }
    $ch = curl_init();
    $url_ = 'https://www'.$paypalmode.'.paypal.com/cgi-bin/webscr';
    $host_ = 'Host: www'.$paypalmode.'.sandbox.paypal.com';
    curl_setopt($ch, CURLOPT_URL, $url_);
    curl_setopt($ch, CURLOPT_HEADER, 0);
    curl_setopt($ch, CURLOPT_POST, 1);
    curl_setopt($ch, CURLOPT_RETURNTRANSFER,1);
    curl_setopt($ch, CURLOPT_POSTFIELDS, $req);
    curl_setopt($ch, CURLOPT_SSL_VERIFYPEER, 1);
    curl_setopt($ch, CURLOPT_SSL_VERIFYHOST, 2);
    curl_setopt($ch, CURLOPT_HTTPHEADER, array($host_));
    $res = curl_exec($ch);
    curl_close($ch);

    if (strcmp ($res, "VERIFIED") == 0) {
         $item_number = $data_ipn['item_number'];
         $model      = ClassRegistry::init('Reservation');
                $model->id = $item_number;
                $model->save(array('is_paid' => 1));
    }
  }
 }  
}
1- Please create file in Component and pass the code above, then save.
2- You have to load the component in your controller
3- Create a function and call the  validate_ipn_data from IPN component
Note : Make sure that your URL pointed to Paypal.

7 Cool Clock Tutorials with jQuery

Before you are going to build something, please search for it if it is existed or not. If it were existed, please kindly to try to use it as much as you can to get the existed concepts from the existed things.

Before you are going to build your very own beautiful clock with jQuery + CSS, I would like to show you some tutorials that show you how to build a very cool clock using only jQuery and CSS.

1. HTML clocks using JavaScript and CSS rotation


2. A Colorful Clock With CSS & jQuery


3. CSS3 Digital Clock with jQuery


4. Lwangaman's dynamic jquery clock plugin


5. Old School Clock with CSS3 and jQuery


6. jDigiClock / Digital Clock (HTC Hero inspired)


7. CoolClock - The Javascript Analog Clock


I hope you have learnt something today with TipPHP. If you have any question please leave a comment below, we will try to help you as much as we can.

Thank you for reading our blog.

Best PHP Frameworks for Beginner

Now a day, there are many PHP framework such as: CodeIgniter, Yii, Laravel, PHPCake, Zend etc. If you are a beginner PHP Developer who want to develop website with PHP Frameworks, we recommend you to try CodeIgniter.


CodeIgniter is a powerful PHP framework with a very small footprint, built for developers who need a simple and elegant toolkit to create full-featured web applications.


Why CodeIgniter?

  • Framework with a small footprint
  • Clear documentation
  • Compatibility with standard hosting
  • No restrictive coding rules

It's really easy, best for small projects, very well documented and you find all the answers to your questions on the internet.

Once you're familiar with it, you can start with another framework like CakePHP, Yii and Zend.

Get Started Now

phpDesigner 8 Best IDE for Your Next PHP Projects

phpDesigner 8 is a fast PHP IDE and PHP editor with built-in HTML5-, CSS3- and JavaScript editors boosted with features to help you create amazing websites. phpdesigner


The main pro of this one is that it's NOT Java based. This keeps the whole thing quick.

Features:

  • Intelligent Syntax Highlighter - automatic switch between PHP, HTML, CSS, and JavaScript depending on your position!
  • PHP (both version 4 and 5 are supported)
  • SQL (MySQL, MSSQL 2000, MSSQL 7, Ingres, Interbase 6, Oracle, Sybase)
  • HTML/XHTML
  • CSS (both version 1 and 2.1 are supported)
  • JavaScript
  • VBScript
  • Java
  • C#
  • Perl
  • Python
  • Ruby
  • Smarty

PHP:

  • Support for both PHP 4 and PHP 5
  • Code Explorer for PHP (includes, classes, extended classes, interfaces, properties, functions, constants and variables)
  • Code Completion (IntelliSense) for PHP - code assist as you type
  • Code Tip (code hint) for PHP - code assist as you type
  • Work with any PHP frameworks (access classes, functions, variables, etc. on the fly)
  • PHP object oriented programming (OOP) including nested objects
  • Support for PHP heredoc
  • Enclose strings with single- or double quotes, linefeed, carriage return or tabs
  • PHP server variables
  • PHP statement templates (if, else, then, while…)
  • Powerful PHP Code Beautifier with many configurations and profile support
  • phpDocumentor wizard
  • Add phpDocumentor documentation to functions and classes with one click!
  • phpDocumentor tags
  • Comment or uncomment with one click!
  • Jump to any declaration with filtering by classes, interfaces, functions, variables or constants

Debug (PHP):

  • Debug with Xdebug
  • Breakpoints
  • Step by step debugging
  • Step into
  • Step over
  • Run to cursor
  • Run until return
  • Call stack
  • Watches
  • Context variables
  • Evaluate
  • Profiling
  • Multiple sessions
  • Evaluation tip
  • Catch errors


Monday, March 21, 2016

Change default jQuery Validation


This jQuery plugin makes simple client side form validation easy, whilst still offering plenty of customization options. It makes a good choice if you’re building something new from scratch, but also when you’re trying to integrate something into an existing application with lots of existing markup. The plugin comes bundled with a useful set of validation methods, including URL and email validation, while providing an API to write your own methods. All bundled methods come with default error messages in English and translations into 37 other languages.

So, in this tutorial I will show you how to change the default standard messages of its plugin.

jQuery.extend(jQuery.validator.messages, {
    required: "This field is required.",
    remote: "Please fix this field.",
    email: "Please enter a valid email address.",
    url: "Please enter a valid URL.",
    date: "Please enter a valid date.",
    dateISO: "Please enter a valid date (ISO).",
    number: "Please enter a valid number.",
    digits: "Please enter only digits.",
    creditcard: "Please enter a valid credit card number.",
    equalTo: "Please enter the same value again.",
    accept: "Please enter a value with a valid extension.",
    maxlength: jQuery.validator.format("Please enter no more than {0} characters."),
    minlength: jQuery.validator.format("Please enter at least {0} characters."),
    rangelength: jQuery.validator.format("Please enter a value between {0} and {1} characters long."),
    range: jQuery.validator.format("Please enter a value between {0} and {1}."),
    max: jQuery.validator.format("Please enter a value less than or equal to {0}."),
    min: jQuery.validator.format("Please enter a value greater than or equal to {0}.")
});

Configure PayPal with Instant Payment Notification

IPN1.PNG
1- Login to your PayPal Business Account
2- Go My Account -> Profile -> My selling tools
3- Click update on Website preferences
4- Choose off for Auto Return and remove the url inside
IPN2.PNG
5- Choose off for Payment Data Transfer
IPN3.PNG
6- Click save button
IPN4.PNG
7- Go to Instant Payment Notification Preferences
8- Enable IPN message -> Pass your notification URL
IPN5.PNG

9- Save


More detail about IPN
4- https://www.paypal.com/kh/cgi-bin/webscr?cmd=p/acc/ipn-subscriptions-outside


Check OS and Browser Agent with PHP


The user agent string is a text that the browsers themselves send to the webserver to identify themselves, so that websites can send different content based on the browser or based on browser compatibility.

Mozilla is a browser rendering engine (the one at the core of Firefox) and the fact that Chrome and IE contain the string Mozilla/4 or /5 identifies them as being compatible with that rendering engine.

In this case I will show you how to detect the Os or Browser Agent using PHP ,

* Check OS
$agent = $_SERVER['HTTP_USER_AGENT'];
// get os
if (preg_match('/linux/i', $agent)) {
    $os = 'linux';
} elseif (preg_match('/macintosh|mac os x/i', $agent)) {
    $os = 'mac';
} elseif (preg_match('/windows|win32/i', $agent)) {
    $os = 'windows';
}

* Check Browser Agent
if (preg_match('/Chrome/i', $agent)) {
    if ($os == 'windows') {
        //impleted;
     } else {
        //impleted;
     }
} elseif (preg_match('/Firefox/i', $agent)) {
   if ($os == 'windows') {
      //impleted;
   } else {
     //impleted;
   }
} elseif (preg_match('/Safari/i', $agent)) {
   if ($os == 'windows') {
      //impleted;
   } else {
      //impleted;
   }
}
- Let's enjoy!

Friday, February 5, 2016

Different language message error from Model Cakephp


That is just a small trick how how we can make our website to be multiple language. For the concept is not different from other
framework, by the way you have understand about folder structure of Cakephp.

In this case you will see the Local folder which its contain the two folder inside.

I have created two folder of language "en and jp".

1- Create language folder. ex. ('en and jp')


2- Create file with extension ".po"
3- There are two key word in the file which you have to understand :
    msgid : it is the key or id which represent the message as a global
    msgstr: it is the message of the key a head
4- Use in model. ex.
public $validate = array(
        'username' => array(
            'required' => array(
                'rule' => array('notBlank'),
                'message' => 'This field is required!'
            )
        ),
        'password' => array(
            'required' => array(
                'rule' => array('notBlank'),
                'message' => 'This field is required!',
            ),
            'min_length' => array(
                'rule' => array('minLength', '5'),
                'message' => 'Password must over 5',
            )
        ),
);

5- check in the file .po syntax
    a- Example in en folder :

msgid "This field is required!"
msgstr "This field is required!"

msgid "Please enter the same value again!"
msgstr "Please enter the same value again!"

msgid "Password must over 5!"
msgstr "Password must over 5!"

msgid "Email already exist!"
msgstr "Email already exist!"

msgid "Please enter valid phone number!"
msgstr "Please enter valid phone number!"

msgid "This field must be number!"
msgstr "This field must be number!"

msgid "Invalid email format!"
msgstr "Invalid email format!"

   b- Example in jp folder :
msgid "This field is required!"
msgstr "必須項目です。"

msgid "Please enter the same value again!"
msgstr "必須項目です。"

msgid "Password must over 5!"
msgstr "パスワードは5文字以上を入力ください。"

msgid "Email already exist!"
msgstr "入力されたEメールは既に存在しています。"

msgid "Please enter valid phone number!"
msgstr "電話の形式ではありません。"

msgid "This field must be number!"
msgstr "数値ではありません。"

msgid "Invalid email format!"
msgstr "Eメールの形式ではありません。"

6- Please configure the language in AppController :

Configure::write('Config.language', 'jp or en');

Ok, that is. Let's enjoy.

Friday, January 22, 2016

Go to position with jQuery


This is just a small trick on how to go to the page section with Jquery by referenced from url. So the concept is not difficult first you need to do is to add the # which will be connected with your link (eg. www.url.com/page#id). After that you can use Jquery window.location.hash to get the "#id" from url. In this code I have used animate function to show the transition while the page is scrolled to the section.


ID


Text Description

$(function() {
        var ha = window.location.hash;
        if(ha) {
            var divLoc = $(ha).offset();
            $('html, body').animate({scrollTop: divLoc.top}, "slow");
        }
    })
 }
}